Alkalinity is one of the most overlooked items when it comes to maintaining healthy water quality inside of our aquariums. It also can have substantial impacts on the health of the animals living within the aquariums. Monitoring alkalinity and taking active steps to ensure your operating at optimum levels is crucial to a healthy balanced water system within our aquariums.
Usually slow, lethargic fish in the aquarium can indicate a bad balance and pH level that needs attention. It’s going to depend heavily on the kind of fish in your aquarium so be sure to exercise caution and use the correct methods before doing much of anything.
That’s what this guide is for. To break down step by step how to handle alkalinity and off-balance pH levels in your home aquatic tanks.
So, what is Alkalinity Anyways, How Does It Impact Our Aquariums?
The question still seems to come up often, what is alkalinity in aquariums? Alkalinity is the capacity of the water to resist changes in pH that would cause the water to become more acidic. Furthermore, alkalinity can be described as the strength of a buffer solution composed of weak acids and conjugate bases.
How is Alkalinity Measured?
Alkalinity can be measured by collecting water samples and determining how much acid is needed to bring the water back to a stable pH level of 4.2. Alkalinity is measured in meq/L (milliequivalents per liter). This will give you a basic breakdown of the amount of monoprotic acid that needs to be added as a titrant. Here are an impressive resource and formula for calculating alkalinity. See here.
How Does Alkalinity Affect Water Quality?
Alkalinity can impact water in several ways. Considering alkalinity is the waters capability to neutralize acids, it mostly is the ability of the water to absorb H+ Ions. Without Alkalinity, the water would have a tough time battling against rapid rising pH changes. Living organisms such as those in your aquarium or even fish species living in rivers and lakes need pH levels in the range of around 6.0-9.0.
Within your fish aquarium, you have much less to worry about than natural bodies of water must deal with. Thunderstorms, melting snow and other natural events throughout changing seasons can cause rapid changes in pH levels and impact the alkalinity of the water. Even rain can have huge impacts on the pH levels of natural water.
How Do I Lower and Treat the Alkalinity in My Fish Tank?
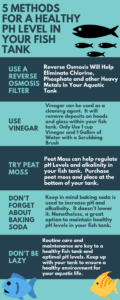
Many people are probably curious as to how to lower and or fix the alkalinity in a fish tank. Start by diluting the aquarium. You can do this by using low-mineral purified water. This is the process of Reverse-Osmosis. This method produces water with nearly no dissolved minerals and will quickly water down the high alkaline levels in the fish aquarium.
The main idea behind lowering or fixing alkalinity in aquariums is removing some of the dissolved minerals in the aquarium. It’s always important to keep in mind that many popular aquarium fish need low alkalinity to survive so without proper treatment and monitoring, you run the risk of killing your aquatic life.
A Problem You May Encounter with Alkalinity in Aquariums
Lowering the alkalinity in a fish aquarium is one process and fairly easy but to drop it significantly can pose more issues. Usually, when you can reduce the alkalinity substantially, it only remains at low levels for a brief amount of time. The rapid adjustments can also be somewhat dangerous to the aquatic life within your fish aquarium, so care should be exercised.
To effectively lower the alkalinity in the fish aquarium, you must first reduce the hardness level in the water which leads us to our next point. Reverse Osmosis can be a great starting point for accomplishing this.
Using Reverse Osmosis to Lower Alkalinity in Aquariums
Using reverse osmosis is the most effective way to eliminate dissolved minerals from the aquarium’s water. The simplest and easiest way of performing this is by using a reverse osmosis filter. The reverse osmosis filter will essentially force water out while containing and trapping solids from the water. Not only will the remove the dissolved minerals, it will also remove other toxic materials such as
- Chlorine
- Phosphate
- Heavy Metals
You can find reliable Reverse Osmosis filters anywhere online and sometimes get a pretty good deal. If your using hard tap water or don’t like spending tons of times adjusting the pH levels of your aquarium manually, this is the direction I would take.
If you’re unsure about your tap water quality, start with a home water strip test kit. You can find these in most home department stores or online.
Primary Application of the Reverse Osmosis Filter
To begin, start by running water through your reverse osmosis filter into the aquarium. In most circumstances, your RO filter will come with three tubes included.
Tube 1– Connects to your Home Water Supply
Tube 2- Connects to the RO filter and runs into the Water Collector (Bucket or Canister)
Tube 3– Removes the Wastewater that builds up and collects in the RO filter system.
Please Note- These are the primary uses of the Reverse Osmosis Filter System. You should follow the directions that come with your system for optimal results and ease of use.
Take Care of Your Reverse Osmosis System If You Want Alkalinity and pH Reduced Long Term.
Basic aquarium maintenance calls for cleaning about every 2 weeks. If your using a reverse osmosis system to keep pH levels lower and alkalinity controlled, you want to make sure you are properly caring for the filter itself by following manufacture directions. Most RO filters need cleaned or checked on a regular basis for optimal performance.
Fix the Problem but Don’t Go Overboard
Fixing the pH levels is one thing but dropping the pH too low will create an entirely new problem for your fish aquarium. Now that the pH is lower, you are leaving your tank exposed to fluctuating pH levels which is again, dangerous for the aquatic life inside your fish tank. You now have a reduced capability of buffering acids and bases.
After lowering your pH levels, take active measures in ensuring the pH levels remain stable and don’t begin bouncing all over the board. You can do this easily by using a home aquarium test kit. It should suffice to monitor pH levels and have adequate time to fix issues before aquatic life in your tank begins dying off.
What Determines the Alkalinity of the Water?
Alkalinity is determined by the soil and bedrock through which it passes. In most circumstances, rocks containing carbonate, hydroxide compounds and bicarbonate will account for the total alkalinity in water. Also, borates, silicates, and phosphates will add to the total alkalinity of the water.
Can I use Baking Soda to Lower pH In My Fish Tank?
This is a great question. I had to do some research on this question but here’s what I learned. The answer is no, you can’t lower the pH in an aquarium. Baking soda is used to raise the aquariums pH level, not reduce it. Be sure not to begin adding baking soda to get your pH levels up. Here’s a quick checklist on how this should be performed.
- Remove the fish from the tank before altering any pH levels.
- Dissolve the Required Amount of Baking Soda into the conditioned water in the aquarium.
- After completion of raising the pH levels, you may place the fish back into the aquarium.
Why Are These Steps Important?
We have touched on this briefly, but it’s never recommended to make sudden rapid changes in the pH levels in aquariums. It can kill or leave lasting impacts on your aquatic life. If you have decided that baking soda is your method of choice, you can start by adding,
1 Teaspoon per 5 gallons of water. This will raise the pH levels at a slow enough pace not to hurt the fish and give the fish adequate time to adjust to the changes. You can also do bonus items to help the process such as adding crushed coral or dolomite chippings.
Can Vinegar Be Used to Lower Alkalinity and pH Levels in a Fish Aquarium?
Yes, vinegar is another household item that can be used to adjust pH levels in your home fish aquarium. Again, just like mentioned before, you can use vinegar to adjust the pH levels, but you need to exercise caution when doing so. Do not use any form of vinegar except for distilled white vinegar. If you use wine vinegar or apple cider vinegar, it can harm or kill the aquatic life in your aquarium.
Vinegar will serve a primary purpose of cleaning mineral deposits off the hoods and glass of the aquarium above the top water level. You can create a solution with a ratio of
- 1 Cup Vinegar
- 1 Gallon of Water
You don’t need to spray the solution directly onto the glass of the aquarium. Pour some of the vinegar onto a scrub brush or rag and begin applying pressure to the area you are cleaning. You may have a bit of runoff into the water. This will be okay and not harmful to aquatic life. The (carbonates) will buffer the water and not harm the fish.
When you use the distilled white vinegar, it will contain a 5 percent acetic acid. Its pH level will be 2.4. Doing so will lower the pH levels and alkalinity of the water. Overall, you shouldn’t see a fluctuation of more than .03 points from the original pH levels.
Will Almond Leaves Reduce pH Levels and Alkalinity In my Aquarium?
Yes, almond leaves can lower the pH levels in your tank. It’s a great natural way of doing so. Not only are you naturally reducing the pH levels, but the almond leaves can help keep your fish active and healthy. Almond leaves contain anti-inflammatory characteristics that benefit your aquatic life.
Also, almond leaves are going to add nice scenery to your aquarium. Before using almond leaves, be sure to soak them in water for 24 hours before you place them in your tank. This will reduce the chances of the leaves releasing tannins that can leave a yellow tint to your water.
Once they have soaked, you can place them on the bottom of your tank wherever you would like. Be sure to repeat this process every 12 months. 6 months is preferable, but 12 months will be just fine. They will begin looking aged and unattractive in the tank. At this time, it’s recommended to repeat the process to yield the desired results.
You can find these almond leave strips in nearly any pet store or online.
What Should the Alkalinity Be in a Fish Tank?
Aquatic life functions best when the pH level (range) between 6.0 and 9.0. This doesn’t necessarily mean that you’re doomed if the alkalinity drops below these levels. The key is to attempt to avoid rapid drops in the pH. This is known as “acid shock” when the pH levels do change to rapidly or increase and decrease in too short of a period.
Will Low Alkalinity and pH Levels Kill My Fish?
Yes, too low or too high alkalinity or pH can kill your fish in your tank. Your fish will begin by getting sick and eventually die if you don’t monitor and treat your alkalinity and pH levels accordingly. Also, too high of alkalinity can result in the skin of fish being burnt.
Additionally, pH levels being imbalanced or too high or low can result in fish eggs never having the ability to hatch, essentially killing the fish eggs.
What Symptoms Will My Fish Show if Alkalinity or pH is too High or too Low?
Thankfully, spotting overly high pH levels or pH levels that are too low can be easily detected by monitoring the behavior of your fish. When the pH and alkalinity is too high within your aquarium, your fish may be acting,
- Overly Excited
- Swimming Rapidly or Chaotically
- May Attempt to Jump Out of the Tank
Your fish may also do the opposite and show a decreased energy level and act sluggish, lethargic or exhibit signs of labored breathing.
All of these are potential warning signs that you need to adjust the pH levels quickly in your aquarium to avoid further harm to the aquatic life’s health.
Other Potential Warning Signs of Overly High or Too Low Alkalinity
Sometimes it won’t be your fish showing the signs and symptoms of imbalanced alkalinity in your aquarium. It may also be the tank and environment displaying warning flags.
You should also be watching for the sudden growth of green algae which will usually present on the walls or ornaments within the tank.
You may also notice the algae coating the plants with slime like texture. If you see this, it’s time to act and adjust the pH and alkalinity according. When it reaches this point, the fish are already experiencing negative health impacts and the water is becoming toxic.
Remember from other critical points in this post, adjust the levels slowly and don’t create a rapid change in the alkalinity. This will only lead to further damage to your tank and aquatic life.
Other Methods to Lower Alkalinity in Saltwater Aquarium and Fresh Water Aquariums?
We have covered how to raise the pH levels to desired ranges, but it’s also important to understand how to lower the pH levels to optimum levels when necessary. We have touched on some options briefly but let’s cover some other common methods we can use.
What Other Options Do We Have to Reduce Alkalinity in Aquariums?
A standard method to lower alkalinity and pH levels in saltwater’s aquariums is to add peat moss. To do this, you can add the peat moss into a mesh bag and add it to the filter. This is a gradual process.
You may notice some slight discoloration in the water after the peat moss has been added, but it’s nothing to sweat. It will clear up quickly and begin activating carbon to help the process along. Here are a few other quick tips and methods you can use to get the pH and alkalinity down in your aquarium.
- Decrease the Aeration of the Aquarium
- Increase CO2 Levels in the Aquarium
- Add RO Water
- Add Driftwood (This will soften the water and in return lower your pH levels)
Let’s break these down just one step further.
Decreasing Aeration in My Aquarium
Your fish need oxygen. Finding the correct balance is the key to healthy pH levels and alkalinity levels. In the oceans, you naturally have plenty of aeration and water movement. In fish tanks, we don’t have this luxury, so we must manually substitute and create this natural process.
Aeration pumps take the water in an upward movement. In theory, this is perfect, but if pH levels are too high, you may need to decrease the aeration to get the levels down. If the surface tension of the water is being “broken up,” your achieving step 1.
You can’t technically overdo aeration or oxygen levels, but a drawback of these systems is the CO2 that’s released. That’s when aeration needs to be scaled back to drive down the pH levels. Usually, this can be performed easily by adjusting the setting of the aeration system you are using or swapping for a different system.
Keep an eye on the pH levels and alkalinity to ensure you aren’t going overboard with your efforts.
Increasing CO2 Levels in Your Aquarium
This is going to be the exact opposite of what we just touched on. Using aeration alone is going to increase the CO2 levels in your fish tank. If this is a step you know that needs to be completed to level off pH levels within your tank, any aeration system will get the job done and raise the CO2 levels in your tank.
Using Driftwood to Balance your pH Levels in Your Aquarium
Before using driftwood in your tank, you need to take a few critical steps in preparation first. The first thing to keep in mind is that driftwood will take some space in your aquarium. It doesn’t make it any less useful for balancing the alkalinity in the water so should still be considered a viable option.
Step 1– Take a second to visualize where you are going to place the driftwood within your tank.
Step 2– Be sure to clean the driftwood. You can use a simple scrub brush and remove all dirt and debris from the wood before tank placement. Under no circumstances should you use any chemicals or cleaning agents to complete this step. It will ultimately kill your fish and poison the water. After cleaning allow the driftwood to soak in water and “cure” for at least 24-48 hours.
Step 3– Wait. You need to allow the driftwood adequate time to cure and soak. An easy indicator of when this process is complete is to wait and watch for the driftwood to sink. Once the driftwood is “waterlogged” it will sink and no longer remain buoyant. After you notice no more discoloration in the driftwood, the curing process is complete. At this time, it’s safe to place the driftwood into your tank.
Step 4– Place the Driftwood in the original locations within the fish tank that you mapped out in step 1.
Another Option- Boiling Driftwood
You can also opt to boil the driftwood instead. It has plenty of benefits. Boiling the driftwood is going to speed up the process dramatically. Also, boiling the driftwood is going to sterilize the wood. 1-2 hours of boiling will get the job done and have the driftwood ready for placement.
Stop the Problem Before the Problem Even Exist
We have discussed in depth, effective ways of lowering pH levels and alkalinity in aquatic fish tanks. We have also covered viable methods for bringing pH levels up if necessary.
What we haven’t mentioned is that easy ways do exist to keep the pH levels at optimum levels. This will eliminate the problem before it even exists. Use soft, low alkalinity water in your aquatic tanks is a great starting point.
Install a reverse osmosis filter that we discussed previously is another great starting point as well. You can also purchase pre-treated water from any fish supply store or even most local grocery stores.
Lastly, although it seems like quite the task, you can collect and use clean rainwater for your aquatic tank. Rainwater is universally known to be very soft. This may seem like the most far fetched things you can do but it is a viable option if necessary.
Another method you can use is limit all sources you are adding to your aquarium. Keep the additional chemicals being added to a minimum. Consistent levels are key. The fewer chemicals you use, the better of an understanding you have about each chemical and if you notice a problem, it’s easy to eliminate one chemical or switch chemicals to attempt to remedy the pH levels.
Don’t Forget About Routine Maintenance for Your Aquarium
Routine maintenance is going to help avoid issues altogether. Ensuring you are using a properly functioning filter and changing the water all together on a regular basis will help prevent the potential of the tank becoming toxic and harming your aquatic life.
Here are some other quick checklist items you can perform on your tank just to be sure it’s functioning correctly. This will help regulate and control your pH and alkalinity levels.
- Check and Change Your Filter At Correct Intervals
- Clean Your Water Pump (Once A Year Minimum)
- Replace Any Carbon in Your Filter on a Regular Basis
- Ensure Your Temperature is Correct for the Aquatic Life in Your Tank
- Ensure Power and Corner Filters Are Flowing Water Properly
- Ensure Aeration System if Being Used if Functioning Properly
What Problems Have You Encountered with Your pH Levels in Your Aquatic Tank?
Although lowering the alkalinity levels and pH levels in aquatic fish tanks is 100% doable and not that daunting of a task, it’s advised to take active steps in using the correct filters and water to keep the alkalinity levels at the proper levels. Rapidly changing pH levels and sudden drops and increases can be harmful to your fish and aquatic life.
Your Turn
Do you have any experience or related stories regarding your aquariums pH and alkalinity levels? How did you make the adjustments?
Related Aquariums-at-Home Articles
How to Grow Live Plants in Aquariums


